Here you go,
How to Build Macros in MS Excel and Word<?xml:namespace prefix = o ns =
"urn:schemas-microsoft-com:office:office" />
Some repetitive tasks in
<http://www.ehow.com/how_4449795_build-macros-ms-excel-word.html##>Microsoft
<http://www.ehow.com/how_4449795_build-macros-ms-excel-word.html##>Word or
Excel can be recorded, saved and run by clicking a toolbar shortcut. The
process is pretty easy and can help teach you how to use macros to make
your life easier and also start you on the road to compiling and writing
your own Visual Basic modules. Follow these instructions, then use your
imagination to build macros that relate to the work that you do most
Instructions


Things You'll Need:


·                           Computer with Internet access

·                           Microsoft Word or Excel

·                           Paper

1.                     Step 1
Build a
<http://www.ehow.com/how_4449795_build-macros-ms-excel-word.html##>macro
for text formatting. With a document or spreadsheet open, from the "Tools"
menu select "Macro," then "Record New Macro." In this window, type in a
name for your macro (such as "FormattingForProjectA" or
"FormattingSpecial"). In MS Word be sure that the "Store Macro In:" is set
to "All Documents" so that you can use the macro in any word document. In
MS Excel, store the macro either in "This Workbook" or the" Personal Macro
Workbook," depending on whether the macro will be used in more than one
workbook.
2. Step 2
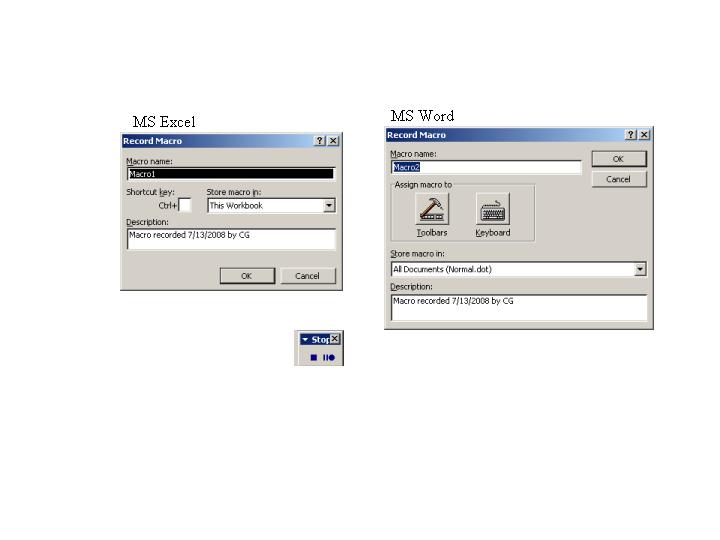
<http://cdn-write.demandstudios.com/upload/0000/900/70/7/30977.jpg>
28b2b66.jpg
"Record Macro" and "Stop" windows.
Click "OK." You will notice a small window named "Stop" at the top. Move
this window if necessary, but do not close it, as this stops your macro
recording. Select the text that needs to be changed and make the necessary
changes such as bold, underline, italic, text color or highlighting. When
you are finished, click the solid square in the small "Stop" window and
your macro recording will stop.
3. Step 3
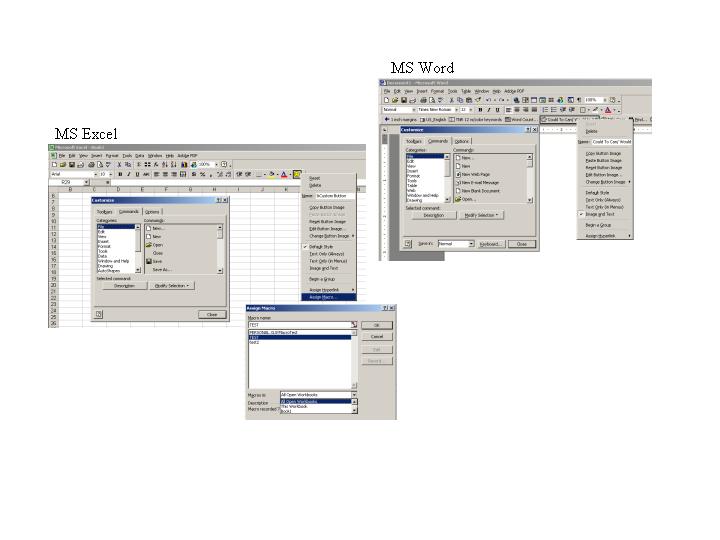
Add your macro to a toolbar for one-click use. In MS Word, right-click a
toolbar and select "Customize." On the "Commands" tab of the "Customize"
window, select "Macros" from the "Categories" column on the left. Then
find the macro you just named in the "Commands" column on the right and
drag it to the toolbar. With the "Customize" window open, right-click your
new toolbar shortcut to change the name (just the shortcut name not the
macro name), add a button icon or perform other formatting. When you are
finished, close the "Customize" window. In Excel, right-click a toolbar
and select "Customize." On the "Commands" tab of the "Customize" window,
select "Macros" from the "Categories" column on the left. Drag the custom
button to the desired toolbar. With the "Customize" window open,
right-click your new toolbar shortcut and select "Assign Macro." Find and
select your new macro and click "OK." You can at the same time change the
name (just the shortcut name not the macro name), change the button icon
or perform other formatting. When you are finished, close the "Customize"
window.
4.                     Step 4

<http://cdn-write.demandstudios.com/upload/0000/900/80/7/30987.jpg>
28b2ba5.jpg


Add the macro to a toolbar.
Now you can test your macro by selecting some text and clicking the
shortcut. If the macro does not work as expected, you can try re-recording
by going through all of the steps above again (you can delete the old
shortcut when you open the "Customize" window). Another way to fix a
recorded macro is to go to the "Tools" menu, select "Macro" and
"<http://www.ehow.com/how_4449795_build-macros-ms-excel-word.html##>Visual
<http://www.ehow.com/how_4449795_build-macros-ms-excel-word.html##>Basic
Editor."
5.                     Step 5

<http://cdn-write.demandstudios.com/upload/0000/900/50/8/30958.jpg>
28b2bb5.jpg


Visual Basic Editor
Learn some simple Visual Basic writing by examining recorded macros and
combining or changing them while using the program help files and the
Microsoft knowledge base as learning tools. Record multiple macros that
perform different actions and combine them to further automate a single
shortcut. Or find ways to enhance your macros by organizing entire new
toolbars containing multiple macro shortcuts for formatting, changing
margins, finding and replacing data or just opening menu items to name a
few (see Resources below).
Tips & Warnings
* There are slightly different instructions given for MS Word and MS
Excel in this article--be sure to use the appropriate steps for each program.
* If you do something over and over, it pays to take the extra time to
set up a toolbox shortcut. In the beginning it will be slow, but as with
any new endeavor, it gets easier with practice.
* The windows and other views may be different on your computer than
shown here. Consult Microsoft Support for specifics on your version of
Windows (see Resources below). If you are unsure or are not confident
enough to try this exercise, wait until you have more experience with
your computer and software, or take a class for more personal instruction.
Resources
· <http://support.microsoft.com/search/?adv=1>Go
to the Microsoft Support page for help.
How to Create a Microsoft Word Macro that a Macro is a shortcut to
something you do a lot. In this part, you'll learn how to create your own
Macros. The simple macro we're going to create will do the following:
· Change some highlighted text to an Arial, 16 point Bold font

Let's get started.

· Open a new Word document

· Type in a few words of text. Anything you like

· Highlight your text, or just a single word of the text

· From the menu bar, click on Tools

· From the drop down menu click on Macro

· A sub menu appears

· Click on Record New Macro
When you click on Record New Macro, you get the Macro dialogue box popping
up. It looks like the one below:
28b2bc4.jpg
There are four areas to the Record Macro dialogue box: Macro Name, Assign
macro to, Store macro in, and Description.
The first thing to do is to give your macro a name. At the moment it is
called "Macro1". That's not a very descriptive name for what we want our
macro to do. We'll call our macro FontChanger. Notice that we haven't put
a space between the two words. This is because macros don't like having
spaces between words. You have to put the name of your macro as all one word.
So go ahead and type in FontChanger as the Macro name, instead of Macro1.
The next section is "Assign macro to". You are given the choice of either
Toolbars or Keyboard. Ignore this section for now. We'll see later how to
assign our macro to a toolbar, and to the keyboard.
The next section is "Store macro in". At the moment it reads All Documents
(Normal.dot). Remember what Normal.dot is? That's the basic template for
all Microsoft Word documents. In other words, the macro we create will be
available to any new Word document. You can change this so that the macro
is created in only the document you're working on. Click the black down
arrow to see the title of the document you have open.
The final section is Description. This is just a record of when the macro
was created, and who created it. You can change this to anything you like.
Malicious folk creating nasty macros will definitely change these details.
Once you have given your macro a name, click the OK button. Your dialogue
box will look like this:
28b2bd4.jpg
When you click the OK button, you are returned to your Word document. But
now you will see a strange toolbar floating over your page. And the mouse
pointer will be different. Your page will look like this:
28b2be3.jpg
The reason the little floating toolbar says Stop is because your macro is
already being recorded. The process has started. You don't have to panic,
and hurry it along. Take your time and think about what you're going to do.
The floating toolbar, though, has only two buttons. The square one is the
stop button; the two lines and the circle is the pause button. Notice that
the mouse pointer has changed, with a little cassette tape on the end of
it. This indicates that you are recording a macro.
One thing you can't do with a macro is record mouse movements. If you want
to move your cursor somewhere in your text, you'll have to use the arrow
keys on your keyboard. But the movement of the cursor then becomes part of
your macro.
For our macro, because we highlighted the text before recording, we don't
need to move the cursor. Whatever we do from now on will become part of
our macro.
· So click on Format from the menu bar

· From the drop down menu, click on Font

· The Font dialogue box appears

· Select Arial as your font

· Select Bold

· Select size 16

· Click the OK button on the Font dialogue box

· You are returned to your page

· Click the Stop button on your floating Macro Recorder
· The macro will stop recording, and the process is finished: You have
recorded the macro
If you make a mistake during the recording of your macro, and everything
goes horrendously and badly wrong, you can abort the recording and try
again. To abort your recording and try again, do the following:
· Click the Stop button on your recorder

28b2bf3.jpg


· The recorder disappears

· Click Tools > Macro > Record New Macro
· In the Macro name part of the dialogue box that pops up, type in the
name of the macro that went wrong. In our case that would be FontChanger.
· Click OK
· Word displays a message box telling you that a macro with that name
already exists. It asks if you want to replace it
· Click Yes

· You are returned to your document, and the recorder is displayed

· You can now try again

· If things go wrong again, repeat these instructions
If nothing went wrong, you will now have a macro. So how do you get at it?
To use your new macro, do the following
· Type in some new text and Highlight it

· Click on Tools from the menu bar

· From the drop down menu, click on Macro

· From the sub menu that appears, click on Macros

· The Macros dialogue box appears:

28b2c03.jpg
Select the Macro that you want, then click the Run button at the top right
of the dialogue box. As you can see, the macro we created is in the list,
and already highlighted. When the Run button is clicked, the dialogue box
will disappear, and the highlighted text will change to Arial, Bold 16 points.
You might argue that by clicking on Tools > Macro > Macros, and then
fiddling about with the dialogue box is not exactly a shortcut. Surely
it's just as easy to click on Format > Font, and make your changes from there?
Also, I did a keyword search for macros in bookshare and I found:

<http://www.bookshare.org/search?keyword=Macros>http://www.bookshare.org/search?keyword=Macros
I hope I didn't make stuff sound too confusing tried to put it into plain
English that is understood. Email me offlist if you have any further
questions please?
----------------
?If you go without playing the trumpet for one day, no one knows, two
days, only you know, and more than three days without practicing, girl you
better look out, because everyone will know!?
Today, I find myself constantly saying those words, just to get myself
going, to not give up, and it works. Since I learned to play the trumpet
at the tender age of 10, I have spent so much passion and much diligence
with that instrument that I will not give up on it. Sometimes my
instrument puts me into awkward situations where I feel like they won?t
ever end, but the trumpet gives me a lot of hope with the majestic,
crystal-clear sound it brings to my ears.
----------------
Chela Robles
E-Mail: <mailto:cdrobles693@xxxxxxxxx>cdrobles693@xxxxxxxxx
MSNWindowsLive Messenger:
<mailto:cdrobles693@xxxxxxxxxxx>cdrobles693@xxxxxxxxxxx
Skype: jazzytrumpet
----- Original Message -----
From: <mailto:kimfri11@xxxxxxxxxxx>Kim Friedman
To: <mailto:bksvol-discuss@xxxxxxxxxxxxx>bksvol-discuss@xxxxxxxxxxxxx
Sent: Friday, January 01, 2010 9:28 PM
Subject: [bksvol-discuss] How-to question
Hi, I've never done a macro and I'm wondering how one makes one. I'd love
to be able to find a nifty way so that I can say: 1. bold headings in 16
pt. Times New Roman and put everything else in regular Times New Roman 12
pt.. 2. Make sure the first lines of paragraphs are indented two spaces
(for Braille users). Then I'd like to do another macro the covers all the
find-and-replace stuff. I understand a macro is a program application
that puts a lot of little steps under one result. Any answer that can
explain how one does this in language so that even I can understand it
will earn great thanks for enlightening somebody who gets bewildered with
tech talk. Regards, Kim.
__________ Information from ESET NOD32 Antivirus, version of virus
signature database 4736 (20100101) __________
The message was checked by ESET NOD32 Antivirus.

<http://www.eset.com>http://www.eset.com
No virus found in this incoming message.
Checked by AVG - www.avg.com
Version: 9.0.725 / Virus Database: 270.14.124/2598 - Release Date:
01/03/10 03:41:00


